Welcome to our February 2022 Stray Duckling Waddle! We are hoping to inspire you to make some beautiful cards and 3-D items for Valentines day!
Today I'm showing you a really quick and easy and cute Valentine Treat Holder. In fact I made 15 of these for my granddaughters pre-k class. Here is a what 2 of them looked like:
Here is a video showing you how I made these adorable treat holders:
Here is a close up of how to do the 2nd and 3rd folds:
And here is a photo of all the treat holders I made for my granddaughters class:
Waddle on over to Lori Helvickto see more beautiful Valentine projects!
Here is day 3 of my Valentine Treats videos and instructions! Again, this is a blast from the past - 2017 to be exact.
And here is an updated version using current Stampin'Up product!
Here are the instructions:
You will need a paper cutter that both scores and cuts
You will need a bone folder, and strong adhesive like Fast Fuse or glue dots, or the Tombow liquid glue (you have to hold it in place for a second or 2)
Stamps and ink; Other items you feel so inclined to decorate with - let your creativity out of the box!
Take an A2 Stampin'Up Envelope, white or very vanilla. You can use the Crumb Cake envelopes, but they are thicker than the Whisper White and take a little more manipulation to get them to cooperate. For your first few, I would practice on the white, then graduate to the crumb cake.
Score at 1" on 3 sides - 2 long and 1 short.
On the other short side, cut off 1" (envelope will be in the landscape position on the cutter)
Seal the envelope flap down with adhesive, making sure you go to the edge and that you just put adhesive on the glue portion of the flap. Any deeper than that and the bag won't open up correctly,
Fold and burnish on all three score lines, folding and burnishing in both directions
To make bag, place hand inside of envelope and spread it out. With your other hand, gently tap the bottom until it folds on the score lines - you will form 2 triangles at each end.
Glue the triangles down for a flat bottom
Decorate to your heats content!
Handle is a 3/4" x 8" piece of whisper white card stock (or crumb cake if you are doing a crumb cake envelope). Stamp before putting on the bag
Using the bone folder, curl this paper and put adhesive on each end. Adhere to the inside of the bag on each end.
I have a video for you, showing you how to make this. Dawn Griffith also has a video which is much better. I have the personality of a snail when I tape video's. I think I may have a career as a golf announcer! I applaud all those Stampin'Up! Demonstrators that do such a wonderful job making videos! I'm not one of them! Anyway, my video gets the job done so here it is:
Here is the video which explains all!
I hope you enjoyed today's video. Comment below to let me know!
Today, another old video that I made in 2017. This is the pinwheel treat holder and it's cute! It uses a 6x6 piece of Designer Series Paper. Again, I decorated it for Valentines day, but you could make it for any occasion!
Here is the new, updated version, using the Sweet Talk Designer Series Paper, found in the January - June 2022 Mini Catalog: The belly band is not really necessary, but it gives you an are to hang some cute decorations without interfering with opening the pinwheel.
Work-Around if you don't have a Envelope Punch Board:
- With a Ruler, mark 2-5/8" from one edge - the top. Then mark 3-3/4" down from the top, on the right side. Take a ruler and line it up with the marks. Take a bone folder and score along the ruler. Do this for all 4 sides. Continue with Step 2.
Directions:
Take 6 x 6 DSP and with right side up, use the envelope score board.
score on all 4 sides at 2-5/8". Do not use the punch!
After scoring, fold on all 4 score lines.
You will see that there are small triangles formed where the 2 score lines intersect, per side. Trim out where lines intersect.
Once the triangles are cut out, take the DSP and place it, wrong side up on the Simply Score, scoring tool and score at 3/4" to the notch (stop where triangel cut out begins) Do this on all 4 sides.
Once this is score, fold back the 3/4" flaps, fold forward the score lines that were made at 2-5/8".
Fold each side, going clock wise. The last flap tucks in.
For Belly Band:
put candy in the pinwheel treat holder
Take belly band and wrap around to the back, pinching the folds-trim back if necessary
Take off the band and stamp and decorate
Add Adhesive to back band and wrap around treat holder, making sure it's loose enough to slide off.
Your project is now complete! And now the video to further confuse you!
I hope you enjoyed today's video. These are simple, fun treat holders to make. I hope you make bunches of them! Let me know if you have any questions!
Today is Ground Hog day, and also, in the church, Candlemas, (or Purification of the Blessed Virgin Mary or Feast of the Presentation of the Lord). Lots going on today, not to mention the blizzard that is raging outside my bedroom window. So I thought today would be a good day to start my series of Valentines - I've been busy not only making Valentine cards, but also Valentine treat holders.I LOVE making Valentine treat holder for my grandchildren to take to school.
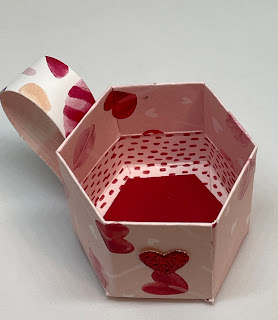
Today, I'm going to show you a really cute treat holder that is more for the teacher or an adult. It would also be very cute for a wedding shower, or bridge club get together (remember those?).
Here is the little cup that holds a Ferrero Rocher or one of those yummy Lindt chocolate truffles. I've updated it showing current paper. This is the
Here is a video that I did several years ago, showing how to make this cup. I actually didn't do a bad job explaining, so why mess with perfection and remake it? This was back in 2017 and the paper I used is not longer available, but you can use any designer series paper that is 2 sided:
Here is are the measurements:
Cup:
- DSP - 5-3/4 x 3
- On long side, score at 7/8", 1-3/4", 2-5/8", 3-1/2", 4-3/8", 5-1/4"
- On short side, score at 1" and 2-1/4 "
Handle :
- DSP - 1/2" x 3"
Watch the video to see how this is put together!
I hope you enjoyed this cute little treat cup. Keep watching....more to come!