Hi all, and welcome to our monthly blog waddle. We are a bunch of central Illinois Stampin'Up demonstrators that love what we do and love to share our enthusiasm with others by teaching and creating.
This month our theme is techniques for making cards. I choose to showcase a technique to make beautiful background images using the embossing folders that you run through the cut and emboss machine and ink.
Here is the first image - Depending on which side of the embossing folder that you ink up - you get 2 very different images. For this sample, I used the new Countryside Blossoms embossing folder.
You open up the folder and on the side that has the Stampin'Up logo or the front of it, pat your ink directly on the inside of the embossing folder, one side only. This first picture is when I inked up the front of the folder - the one with the Stampin'Up logo on it. This is the deboss side to the folder - It fills in ink around the image.
The second sample shows what it looks like when you ink up the back side of the folder - the embossing side. This is the side that does not have the Stampin'Up logo. See...an entirely different look.
4. Place your card stock on the uninked side of the embossing folder. Close and hold tight when placing on the cut & emboss machine.
5. Be prepared to get inky..you will get it on our fingers - so have baby wipes close at hand.
6. To clean both the embossing folder and brayer - just run them under water at the sink - dry off as best you can and then let them air dry. Or you can use a baby wipe to clean off the embossing folder, and once again; be prepared to get inky.
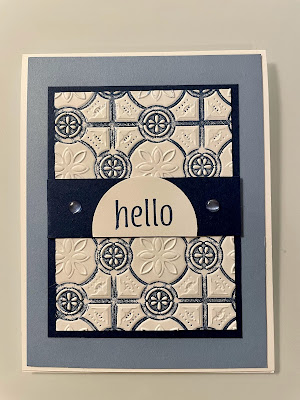
Here are the cards that I made for you today using this technique. I used the retired Tin Tile 3D. Same embossing folder - 2 different looks!
I hope you enjoyed todays techniques. Give it a try with different folders and you will have some new inspiration for making cards!
Blessings, Sheryl


