Welcome to the August 2023 Stampin' Stray Duckling blog waddle!
This months inspiration is color! I must admit, time got away from me and it wasn't until today that I realized I needed a card and I needed to post this blog! So desperation took over and I CASE'd (Copy and Selectively Edit) a card from Brandy Cox. With this card, she used all 5 of the new In-Colors.
Now I will admit, these colors are challenging to use together. They are very muted but beautiful. Here is the card I CASE'd. The only change I made to it was that I used a deckled rectangle to cut out the flower images.
The background on the card base is stamped in Pebble Path, the flowers are stamped in Moody Mauve. The leaves are stamped in Boho Blue and the single bloom is stamped in Wild Wheat. The sentiment, Thank You, is stamped in Copper Clay. I finished it off with the new 2023-2025 InColor dots. Whew! That's a lot of colors. I think this makes a beautiful and elegant card! Plus, it's simple to stamp and put together!
I hope you enjoyed todays card.
Here is the list of the other ducklings and their blog posts!
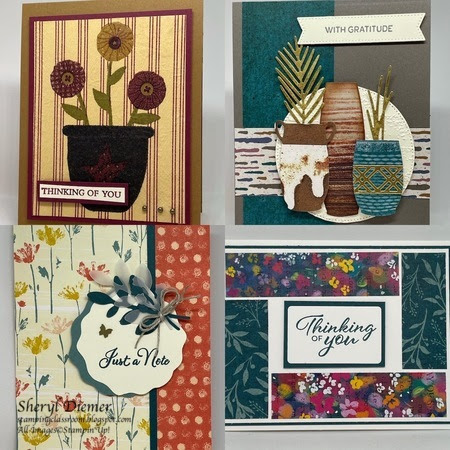
Here are the cards we are going to make in class this month....we are turning our heads toward fall....
The upper left card is made from a paper napkin! I also love both the Inked and Tiled DSP and I really love the Earthen Textures bundle and the Earthen Elegance DSP. The lower right hand corner I used the beautiful Masterfully Made DSP. It's so bright and cheerful!
Class Dates and Times:
Sunday, August 20th - 1:30 - 5:00 pm - my house
Friday, August 25th - 10am - 2pm - Morton Christian Church
Please let me know ASAP if you want to take the class and what date. I will start to cut class kits next week, so I need to know.
Thank you for stopping by today and thank you for participating in my classes. I enjoy teaching and seeing all of you.
I took a month off from classes - we went on a European river cruise in June and my son from Fort Collins Colorado came to visit. I'm all rested up and ready to take on more card classes!
This month I'm featuring all the wonderful punches that Stampin'Up has and their coordinating stamp sets.
Here are the cards:
I used the Bough punch, the Inked & Tiled punches, 2-3/8" punch and the Little Monkey builder punch. All the cards are easy to stamp and put together.
You will make 2 cards each of 3 designs, plus one bonus card (that would be the little Monkey card). Each card comes with an envelope and a recipe of the cut sizes and supplies. All for just $25!
Dates & Time
Friday, July 28th - 10am - 2pm - Church Sunday, July 30th - 1:30 pm - 5:00 pm - my home
If interested in attending, please contact me at sdheiser1@gmail.com. Thanks!
Welcome! This month our inspiration was using our favorite card sketch. My absolute go to sketch was designed by Julie Davison, who is a wonderful Stampin'Up demonstrator here in Central Illinois. Here is her sketch:
I just find this layout very eye appealing. Here is the card I created using this sketch. I used the Earthen Textures bundle - stamp set and coordinating dies and the coordinating Designer Series Paper, Earthen Elegance. I think this may be my all time favorite product from Stampin'Up. It is so much fun creating the pots - the possibilities are endless. Shannon West once said that you just can't make an ugly card with this set.. and I think she just might be right.
The colors I used, I pulled from the designer series paper: Copper Clay, Pretty Peacock, Pecan Pie and Pebbled Path. My card base is Pebbled Path, and I used the DSP for the pots and distressed gold paper to make the elements in the pot. For the circle I used the largest circle of the Stylish Shapes dies and then embossed it with the Exposed Brick 3D embossing folder.
Here are some examples of past cards where I used this layout. As you can tell, I really like this layout!
I hope you enjoyed todays blog and that I've inspired you to use a sketch for you next card layout.
Hi all, and welcome to our monthly blog waddle. We are a bunch of central Illinois Stampin'Up demonstrators that love what we do and love to share our enthusiasm with others by teaching and creating.
This month our theme is techniques for making cards. I choose to showcase a technique to make beautiful background images using the embossing folders that you run through the cut and emboss machine and ink.
Here is the first image - Depending on which side of the embossing folder that you ink up - you get 2 very different images. For this sample, I used the new Countryside Blossoms embossing folder.
You open up the folder and on the side that has the Stampin'Up logo or the front of it, pat your ink directly on the inside of the embossing folder, one side only. This first picture is when I inked up the front of the folder - the one with the Stampin'Up logo on it. This is the deboss side to the folder - It fills in ink around the image.
The second sample shows what it looks like when you ink up the back side of the folder - the embossing side. This is the side that does not have the Stampin'Up logo. See...an entirely different look.
You may notice that it looks a bit blurry in some places. I tried many different ways of inking and running it through the cut and emboss machine, but I still got the blurry look on one side. This embossing folder was not a 3-D folder.
I tried this technique with a 3D embossing folder and the results were much better;
So here are my tips when doing this technique:
1. Use a 3-D embossing folder.
2. Use a folder that has an interesting and spacious pattern to it - Ones that look really good with this technique are Delightful Doily and Quatrefoil Tile. I do not have either one of these folders so for my card sample, I used a retired embossing folder....sorry!
3. To ink up the folder, use a brayer - you get a much more even distribution of ink - an it stays on top of the image on the folder and doesn't go to the background. Brayers can be found in the art department of Hobby Lobby or Michael's.
4. Place your card stock on the uninked side of the embossing folder. Close and hold tight when placing on the cut & emboss machine.
5. Be prepared to get inky..you will get it on our fingers - so have baby wipes close at hand.
6. To clean both the embossing folder and brayer - just run them under water at the sink - dry off as best you can and then let them air dry. Or you can use a baby wipe to clean off the embossing folder, and once again; be prepared to get inky.
Here are the cards that I made for you today using this technique. I used the retired Tin Tile 3D. Same embossing folder - 2 different looks!
I hope you enjoyed todays techniques. Give it a try with different folders and you will have some new inspiration for making cards!
Time for another inspirational Blog Waddle from you favorite Stray Ducklings Group.
This month we celebrate the new catalog products with some new, fancy card folds! You get two for the price of one!
I have to admit, that I have hit a wall with my card creativity. No mojo! The way I try to find my way out of this kind of dilemma is to CASE - Copy And Selectively Edit - someone else's card. So off I went to Pinterest and to YouTube. Secondly, I decided I just loved the Countryside Inn 12 x 12 Designer series paper in the annual catalog. I love blue. So what I discovered was a card called Countryside Diagonal Joy fun fold created by Tami White. Here is a link to her short video on how to assemble this cute card:
I changed it up just a bit - I stamped a border around the front sentiment using the Countryside corners stamp. Here is my card:
It's a really unique looking card and surprisingly easy to make. I used the Countryside Corner dies as well. For the sentiment, I used Go to Greetings.
This card also is one that I am featuring in my May 2023 card class. I'll have more information about that later.
I hope you enjoyed today's card. Here is the rest of the ducklings that are in this waddle:




.jpeg)
.JPG)


